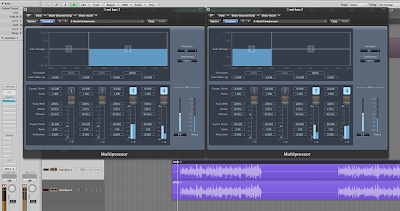
This gives us the ability to do some cool tricks in our digital audio workstation of choice. For example, having a duplicated instrument track with different crossover bands cut on each track allows us to process different frequencies in different ways for the SAME instrument.
This allows us to add a plugin that might only affect the high frequencies of a guitar or bass without affecting the lows, for example.
All these tricks rely on disabling the compressor part of the plug-in by setting a 1:1 compression ratio (ie no compression) - we only want to use the crossover part of the plug-in.
BASS GUITAR
Say you want to put a flange or chorus on the bass guitar without robbing the bottom-end fatness. Usually inserting delay-based effects on an instrument causes comb filtering, which greatly affects the frequency response over the entire spectrum - with some pretty major frequency cuts going on. This is particularly critical on any instrument where you wish to retain the low frequencies.
Duplicate your bass region to an extra track then insert a multi-band compressor on both tracks. You really only need two frequency bands for this.
Cut the top band on the "bass" version of the track, and cut the bottom band on the other one that you want to insert the chorus/flange on. This will be inserted after the multi-band plugin by the way.
This assumes that you have your crossover points set the same in each multi-band plug-in. Set the crossover frequency to around 200 Hz for starters, then tune for best effect. Remember - make sure you match this crossover point on both multi-band plug-ins.
Tip - fine-tune the delay time in your chorus or flanger to make it sound the most "musical".

Note that this trick also works really well when adding distortion to a bass - although in this particular case you may want to set up one of your two duplicate bass tracks to distort the entire bass guitar spectrum, and have the other track so it just blends in the clean low bass.
EQ
Another trick - tweaking the "EQ" by boosting and cutting bands rather than using conventional EQ. This is great for just fixing up broad EQ problems - eg too much top or bottom end, but with no real peaky frequencies that need fixed. Using the multi-band keeps the sound smooth.
DE-ESSING
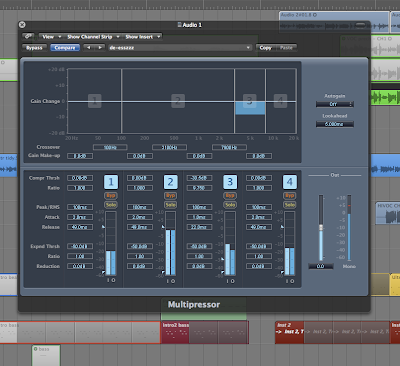
Need to fix a sibilant frequency? Obviously if you have a dedicated De-Esser plug-in, this will probably do the trick, but if you don't have one - try using just a single band on the multi-band compressor instead. Make sure the other bands are set so they don't activate, then set one band between eg 3kHz and 8kHz (use your ears). Stick a high-ish ratio on it (say 8:1), set the threshold quite low; -20dB to -30dB. Tweak to suit.

Note that although de-essing is the most obvious use of this kind of technique, this will also work on other "resonant" frequency problems - perhaps a single bass note that goes wild, or boomy mids on an acoustic guitar.
DJ Hi-and Lo-Cut techniques.
Most DJ mixers have a fairly extreme set of filters built in for completely removing lows or highs from a track. This can be simulated in your DAW by using two duplicate tracks - one with the lower bands cut in the Multi-band compressor, and the other track with the highs cut. Both tracks together should sound like the original, but muting one or the other tracks will apply the "filter". You can of course do this with a matching pair of high and low-pass filters instead - one on each track, but these may not be as "symmetrical" as the multi-band, so both tracks running together may not sound as "pure" as the original.
Any other tricks you know of?
No comments:
Post a Comment