Friday, October 2, 2009

Digital Recording Levels - a rule of thumb

Okay, I mentioned this as one of my tips in a previous post, but there's confusion and many heated debates out there about the ideal level to record into your digital audio workstation.

I'm just summing up the information readily available elsewhere (if you are willing to wade through endless online debates and the numerous in-depth articles), for people who just want to know right here and now what the best level is to record into their digital audio systems.

So I'm going to start with just a quick easy rule of thumb for these people, followed with a little bit more detail after that to explain why I'm recommending these numbers.

I apologize for simplifying some of the math - but if you're really interested there are plenty of texts and in-depth articles available with a bit of searching. I've included a few references and links at the end of the article.


The rule of digital thumb

  1. Record at 24-bit rather than 16-bit.
  2. Aim to get your recording levels on a track averaging about -18dBFS. It doesn't really matter if this average floats down as low as, for example -21dBFS or up to -15dBFS.
  3. Avoid any peaks going higher than -6dBFS.

That's it. Your mixes will sound fuller, fatter, more dynamic, and punchier than if you follow the "as loud as possible without clipping" rule.

For newbies - dBFS means "deciBels Full Scale". The maximum digital level is 0dBFS over which you get nasty digital clipping, and levels are stated in how many dB below that maximum level you are.

Average level is very important - people hear volume based on the average level rather than peak. Use a level meter that shows both peak and average/RMS levels. Even better if you can find a meter that uses the K-system scale.


Some common questions:

Q: Why do we avoid going higher than -6dB on peaks? Surely we can go right up to 0dBFS?

Answer 1 - the analogue side.
Part of the problem is getting a clean signal out of your analogue-to-digital converter. Unless you have a very expensive professional audio interface, or you like the sound of the distortion that it makes when you drive it hard, then you're going to get some non-linearities (ie distortion) happening at higher levels, often relating to power supply limitations and slew rates.

Most interfaces are calibrated to give around -18dBFS/-20dBFS when you send 0VU from a mixing desk to their line-ins. This is the optimum level!
-18dBFS is the standard European (EBU) reference level for 24-bit audio and it's -20dBFS in the States (SMPTE).


Answer 2 - the digital side.
Inter-sample and conversion errors. If all we were ever doing is mixing levels of digital signals, we would probably be fine most of the time going up close to 0dBFS, as most DAWs can easily and cleanly mix umpteen tracks at 0dBFS.

EXCEPT there are some odd things that happen;
  • Inter-sample errors can create a "phantom" peak that exceeds 0dBFS on analogue playback.
  • When plug-ins are inserted they can potentially cause internal bus overloads. These can build-up some unpleasant artifacts to the audio as you add more plug-ins as your mix progresses. They can also potentially generate internal peaks of up to 6dB - even if you're CUTTING frequencies with an EQ, for example.
  • Digital level meters on channel strips seldom show the true level - they don't usually look at every single sample that comes through. It's possible to have levels up to 3dB higher than are displayed on the meters.
Keeping your individual track levels a bit lower avoids most of these issues. If your track levels are high, inserting trim or gain plug-ins at the start of the plug-in chain can help remove or reduce these problems. Use your ears!

Q: Aren't we losing some of our dynamic range if we record lower? Aren't we getting more digital quantization distortion because we're closer to the noise floor?

Short answer. No.

Really, both of these questions sort of miss the point, as we shouldn't be boosting our audio up to higher levels and then turning it down again. So there's nothing to be "lost".

It's the equivalent of boosting the gain right up on a mixing desk while having the fader down really low, giving you extra noise and distortion that you didn't even need. You should leave the fader at it's reference point and add just enough gain to give you the correct audio level. This is what we're trying to do when recording our digital audio as well - nicely optimizing our "gain chain".

The best way to illustrate this is to throw a few numbers up;

Each bit in digital audio equates to approximately 6dB.
So 16-bit audio has a dynamic range of 96dB.
24-bit audio has a range of 144dB.

With me so far? Probably doesn't mean a lot just yet.

Now, let's look at the analogue side where it becomes slightly more interesting.

The theoretical maximum signal-to-noise ratio in an analogue system is around 130dB.
Being awesomely observant, you picked up immediately that this is a lot less than 24-bit's 144dB range!

In fact, the best analogue-to-digital converters you can buy are lucky to even approach 118dB signal-to-noise ratio never mind 144dB.

So - let's think about this.
If we aim to record at -18dBFS, how many bits does that give us?

24 bits minus 3 (each bit is 6dB remember). That's 21 bits left.
What's the dynamic range of 21 bits? 126dB
What's the dynamic range of your analogue-t0-digital converter again? 120dB-ish.
Less than 20 bits.
One bit less than our 21-bit -18dBFS level.

The conclusion is that when recording at -18dBFS you are already recording at least one bit's worth of the noise floor/quantization error, and if you actually turn your recording levels up towards 0dBFS, all you're really doing is turning up the noise with your signal.

And most likely getting unnecessary distortion and quantisation artifacts.

Apart from liking the sound of your converter clipping, there's NO technical or aesthetic advantage to recording any louder than about -18 or -20dBFS. Ta-Da!

Mix Levels

If you've been good and recorded all your tracks at the levels I recommended, you probably won't have any issues at all with mix levels.

The main thing is to make sure your mix bus isn't clipping when you bounce it down.

Most DAW's can easily handle the summing of all the levels involved, even if channels are peaking above 0dBFS. In fact even if the master fader is going over 0dBFS, there's generally not a problem until it reaches the analogue world again, or when the mix is being bounced down.

Most DAWs have headroom in the order of 1500-2500dB "inside the box". You can usually just pull the master fader down to stop the master bus clipping.

Saying that, it's still safer if you keep your levels under control.
Like I mentioned before - a key problem is overloads before and between plug-ins. If your channel or master level is running hot and you insert a plug-in, it could be instantly overloading the input of the plug-in depending on whether the plug-in is pre-or-post the fader. So use your ears and make sure you're not getting distortion or weird things happening on a track when you insert and tweak plug-ins.

Try to use some sort of average/RMS metering, and try to keep your average mix level between about -12 to -20dBFS, with peaks under -3dBFS.

Mastering will easily take care of the final level tweaks.

To conclude - when recording at 24-bit, there is a much higher possibility of ruining a mix through running levels too high than having your levels too low and noisy.

As Bob Katz says, if your mix isn't loud enough - just turn the monitor level up!

PS - just say "no" to normalizing. That's almot as bad as recording too loud.

References:
Bob Katz' web site.
Plus Bob's excellent book "Mastering Audio - the Art and the Science".
Paul Frindle et al on GearSlutz.com
A nice paper on inter-sample errors

Download a free SSL inter-sample meter (includes a nice diagram of inter-sample error
)
Wednesday, September 30, 2009

Transferring MIDI and Audio sessions from Logic to Pro Tools in about 5 minutes.


It's pretty common to have to transfer a song written in Logic into Pro Tools for a client to mix (or remix). Here's how to do it as fast as possible with the least amount of hassle.


Audio Files Only

If all you need to supply is audio files for transferring to Pro Tools (usually the most common requirement), it's a very easy 5 steps (MIDI files are trickier - we'll get to those later).
All files will start at the same point and be as long as they need to be.
Files won't include any Bus/Aux effects, only what's on each Channel Strip.
Files are PRE-fade (ie the equivalent of the fader being at 0.0), so they may be quite loud.

1. Name your Logic tracks intelligently (double click on the track header to give it a useful name - this is what your file will be named)

2. Make sure the length of your song is set to about the right length -ie not 200 bars if it's only 20 bars long. It's no biggie if you forget this one, but you'll be sitting waiting for longer than you need to while waiting for the files to bounce.

3. Delete any unused tracks and/or mute unwanted regions.

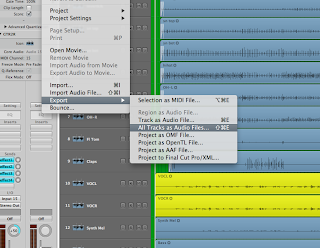
4. Select menu File-Export-"All Tracks as Audio Files".


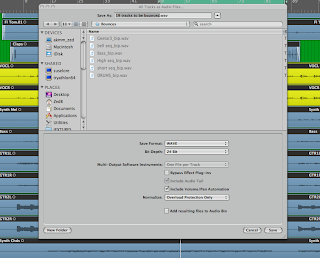
5. Select Wave and 24 bit (unless something else is desired). Select Normalize "Overload Protection Only" (this is not your typical "normalize" function and will just make sure your Channel Strip level will never overload). Make sure you know where you're bouncing to. The default is the "bounce" folder within same session. (You don't have to enter any file name/s). Hit "Save". All done.


Easy huh?


MIDI File Export

Exporting MIDI tracks as MIDI files is a bit fiddlier than creating audio bounces, as many of the processes in Logic such as region Quantise and Transpose are "real-time" and need to be rendered into the MIDI track itself before exporting as a Standard MIDI File.

Do this (assumes standard Logic key commands):

1. Select all MIDI regions you're going to export as a file.

2. Press "Control N" (normalises any region parameters for the selected regions - eg Transpose).

3. Press "Control Q" (normalises any Quantize parameters for the selected regions).

4. Press "Control L" (turns any loops into copies).

5. Press "Shift =" (merges the copies and other regions into a solid file on each track).

6. Name each region with the text tool (you'll thank me later).

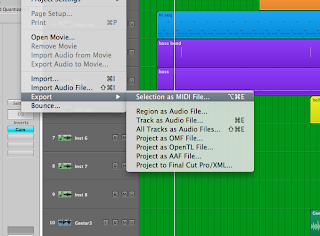
7. Select menu; File-Export-"Selection as MIDI file". Name your file (eg blah.mid), hit Save and you're done.


Importing into Pro Tools

Now to bring these shiny new audio or MIDI files into Pro Tools.

The easiest way is to create a new, empty Pro Tools session, then drag your files directly from the "bounce" folder in Finder and drop them into the empty Edit window in Pro Tools. PT will now import the files and automatically create the appropriate track for each file.

Wednesday, September 23, 2009

Logic 9 - using Pedalboard in parallel mode for fat Bass and Guitar sounds

Click on the photo to enlarge.
A little while back I wrote a blog article about cool things to do with multi-band compressors

One of the things I discussed was how to use the crossovers built into one of these plug-ins to separate the lows and high frequencies of, for example, a Bass track, so that distortion could be added to the top-end of the Bass without robbing the fat bottom end.

Well now with Logic 9's new Pedalboard, you can easily add some grainy distortion to the Bass track without thinning the sound by using the distortion pedals inserted in parallel mode.

Pedalboard is a great new plug-in that has been added to the latest version of Logic, and includes some great-sounding pedals that can be custom-assembled into complete pedalboards. (You can even map individual pedals to controllers with built-in macros, but we won't cover that in this article)

By dragging, for example, a Distortion pedal from the selection box on the right into the main pedalboard, then adding a Splitter pedal, you can then click on the name above the Distortion pedal to toggle it between series and parallel modes.

Series means the whole Bass sound goes through the distortion pedal, parallel means the distortion pedal is blended with the original dry Bass sound.

What's even better is you can switch the Splitter pedal into "Freq" (Frequency) mode. This allows you to select what range of frequencies goes into to the parallel chain. In my example, I've set it to send from 1.5kHz upwards. (Hint: to see this exact value, I temporarily switched the plug-in "View" from "Editor" to "Controls").

When you insert a Splitter pedal, it automatically inserts another Mixer pedal at the end of the chain so you can blend the two parallel paths back together again, in whatever proportion you desire.

Here's another tip - if you've recorded your electric guitar straight into Logic via your audio interface and are then adding effects in Logic - try using the parallel mode to blend your clean electric guitar with the distorted version on the other side of the parallel chain. This can give your wall of distorted guitars some extra clarity.

Sunday, August 23, 2009

12 Tips for improving the quality of your recordings


1. When recording to digital - keep your levels a bit more conservative. Aim for -18dBFS when recording at 24-bit. And at 16-bit? Best to just stick to 24-bit. Don't worry about levels looking low on the meters, and don't worry about "having less bits available". You're still getting 21 bits, which is about the maximum you can actually encode from the analogue side anyway. You're not losing anything, and you're getting decent digital headroom and much bigger/more dynamic sound. Try it!

2. The best EQ you'll ever get is on the end of the microphone. Spend time getting an awesome sound from the microphone itself, and your mixing will be much easier. Get the mic/instrument position nailed and try different mics if the sound's not working for you. Omnis are awesome. Don't think the most expensive mic is always the best, either - the humble Shure 57 and Sennheiser 421 are more than just drum mics.

3. Don't over-compress everything. Be judicious when you compress - be aware of what you are trying to achieve. Are you even-ing out the performance of a bass track? Or compressing the drums to get a particular texture? Don't just do it to "turn it up". That's what the faders are for. If you want your overall mix to sound louder - get the mastering engineer to do it. Over-compressing will rob your song of "punch" and fatness.

4. Set the compressor release-time so it works with the rhythm of the track. Set it as long as possible but so level reduction still manages to get back up to unity before the next beat/phrase. Then fine-tune so it adds to the groove. It's tempo-based.

5. Work with the song arrangement. The maximum volume in any given song is divided into however many sounds/instruments you have playing at the same time. 20 small guitars do not usually sound as impressive as one big guitar. (They might have an interesting texture though). The instruments in a 3-piece band will sound bigger than those in a 12-piece band UNLESS you deliberately leave space for each instrument at different parts of the song. Don't be afraid to cut things out, or to have musicians not play at various points - which leads into...

6. Create contrast. On the subject of arrangement - take a leaf out of Nirvana's songbook - create big contrasts between, for example, verses and choruses. "Loud" only sounds loud if it's got some "quiet" to compare against. Another reason to watch your compression, too. Try subtly easing down the rhythm guitar level as you go through the verse, and then suddenly bring it back up to the original level for the chorus. Sounds loud again, doesn't it?

7. Commit. Don't record 70 takes of a vocal track and then edit it later. Why didn't you just keep doing punch-ins until it was right? Now you're going to have to spend 6 hours trying to edit vocals when you could have got a decent take in probably an extra half-hour. Murphy's law will also make sure that NONE of those 70 takes contains a good first line of the third verse.

And if you think that the rhythm guitar sounds perfect with that grottelflange pedal on it - record it like that! If you're paranoid - capture both versions - and keep the clean guitar track in a backup session.
In other words - don't defer all your decisions till the mix - make a call and go with it.

8. Be daring. Bands don't usually become famous for sounding just like other bands (maybe in the short-term). They become famous for being unique. If the band sounds like everyone else, you'd better be trying hard to find something unique in there and be highlighting it. Or find a unique way to present them in the recording by your approach. Don't be scared to go "over-the-top" with effects - you can always make them more conservative if you have to, but it's almost impossible to go the other way once you're used to the sound you have.

9. Err on the side of performance. There's magic in a good performance. Does it give you goose-bumps? Better to have a piece of music that moves you than something that's technically perfect but "cold". This is where an experienced band can nail it - they can give a good performance early-on, before they get bored. By the way - don't run-through the whole song when sound-checking otherwise the performers get stale before you're ready. And why weren't you recording already anyway!?!?!

10. Highlight character. Often it's the imperfections that make our ears prick up. Ideally the imperfections shouldn't be big enough to ruin the song, though. Have you often thought the demo of a song is better than the final recording? What made the demo unique? Don't try to make every instrument "perfect". Don't EQ instruments while they are solo'ed - you'll end up trying to make everything sound fat and full, which adds up to "bland". Try to make at least one sound unique in the mix.

11. The mixdown is a performance too. If the levels are static in your mix, it's going to sound boring. The human brain is wired to detect change. You better have some stuff changing through the song to keep the listener's brain stimulated. If you have an interesting arrangement, you probably don't need to worry so much about eg levels changing through the mix, but if your mix lacks contrast, you'd better be riding those controls. Think of the song like a movie - what's the camera looking at now?

12. Use your ears - not your eyes. One of the dangers of digital recording is that we can see what the waveform looks like. And what the levels look like. And what the EQ curve on the plug-in looks like. Turn off the display when you're doing your critical listening. Don't move all the drum beats and bass and guitar perfectly in time - they'll sound tighter but thinner. Don't tweak your EQ until it "looks" better. Have you noticed how you notice things differently while you're bouncing the final mix?

Busy week - recording jazz

I've had to put my own stuff on the back-burner for a bit since work's been so busy.

It's that time of the year when the tutors are rostered on for spending a week in the studio with the Diploma Audio students recording two songs for each of the Diploma Music bands. It's fun, but even regular admin work has to be done after 6pm each night, never mind any classes that have to be prepared, marking etc.

Also - went and recorded Mark Baynes' jazz trio live at the Lewis Eady piano showroom the other night with some students - Mark played on a $185,000 Steinway! Nice. The recording came out well.

I was a bit worried - I would usually use something like Pro Tools and a Digi 003, but we needed more mics (stupid 003 only has 4 mic preamps) so we ended up using my own Presonus Firestudio and my MacBook Pro running Logic 9. Two 50-odd minute sets went down without a hitch. Logic 9 somehow seems to sound better than previous versions!

MAINZ tutor and microphone-setup guru Paul Streekstra did the mic'ing up. Mostly omni mics - pair of Earthworks QTC50's over the piano, pair of Neumann Km133 omnis over drum kit and EV RE27 on bass drum. DI'd upright bass (he was playing through an amp) to which we ended up adding the "spare" Shure 57 pointing at the f-hole. It actually sounded great - hehe the good ol' 57 still works well. Not just a snare mic after all.

The students really enjoyed it - they often over-think things and try to get too tricky with microphone placement, and even their mic choice.

Monday, May 18, 2009

Songwriting - can it be taught?

I just spent the weekend at a songwriting workshop by Jason Blume. It was awesome.

This is the second one I've participated in, and to be honest because I'd helped organise my workplace to host the workshop, I got to go for free.

I'd always been a bit hesitant about going along to workshops and training seminars about songwriting, because I always figured "I don't want somebody to give me rules that I have to stick to - I want to make my own ORIGINAL music, maaaan" (That last because I'm kind of whining as I think that).

This is also why I resisted learning music theory ;o)

Anyhoo - now that I've been to a few of these things, I realise that they DON'T rob you of your unique voice and creative centre - in fact it's more liberating if anything, because one of the main things that Jason expounds is that there are no rules. You can make whatever music you want, and it's all great.

However - he is a storehouse of astute observations about songwriting (as well as the music and song publishing industries). So rather than saying what is right and what is wrong, he will point out that most of the popular songs have certain things in common - for example a chorus that has a memorable melody and lyric, and that can deliver an appropriate emotional reaction.

Jason will not tell you how to write your chorus, but he might certainly observe that it doesn't really sound different from the verse, or that the song drops rather than lifts at that point, or the words or phrasing don't't make sense, or something along those lines.

He also makes a distinction between songs written by people for their own pleasure, and those who write for the public - if you are writing for yourself feel free to do whatever you want, if you are doing it for others, then it's probably good to make it easy for them to engage with, and hopefully remember your song.

One of the most interesting things Jason does is to critique songs that people bring along to the workshop (either on CD/iPod or playing them live).

This is a real eye-opener, as you can see and hear yourself all the flaws in other people's (and your own!) submissions, especially by the end of the second day, where you are more aware of the aspects to look for.

It becomes obvious that a good song not only has to be a unique, creative and detailed viewpoint of something, but also needs to be well-crafted to highlight its own good points rather than destroy them.
After so many meandering singer-songwriter instrospectives (I've been guilty of doing this for many years as well), it's actually refreshing to hear simplicity and repetition. Half the problem is that everybody wants to be "clever", and instead they end up with cumbersome and meandering and forgetful.

Last year my own submission, which of course I was sooooo proud of - (then my current latest and greatest!), was exposed as having three different verses that all had different structures, and lyrics that mostly failed to be a unique way to say what I wanted to say. It was true - it wasn't a bad song by any means, but all you songwriters out there must know what it feels like to play your song to somebody and hear it though their ears as you listen? I was cringeing.

Over the last year I have taken on board a lot of what Jason taught me at the last workshop - I had written what I felt was a much better song - simpler verses, more repetitive, stronger melodies, a great chorus line. But I was anxious about the verse lyrics, having already thrown them all away a couple of times already and going back almost to the original idea. The lyrics still needed a lot of work to create a solid setup for the choruses, though.
A couple of the lines were even the original scratch lines I jammed along to it when I was first writing the song. One line was a complete throw-away and a bit of a joke. "Check one-two". Whaaaat?

I had hoped to fix a couple of these lines before the second day of the workshop - but some problems with an Apple OSX update corrupted my Logic song session, so I had to submit it as it was.

I actually began to regret putting my song in the submission pile - as the stack grew shorter towards my own disc I grew more and more nervous. "Check one-two!?!?!!" Oh my god, what a stupid line!

Finally, Jason worked down to my own submission. My heart was racing. He put my lyrics up on the projector. There were some snickers and giggles - oh the humiliation!
He flipped the disc in the player and hit play.

Doesn't sound toooo bad, nice hooky intro rhythm, clean verse lines (Argh those lyrics! Argh I hate the sound of my own voice). Kicks up into the pre-chorus, then bang into the chorus - phew - relatively safe. Then suddenly STOP!!!!!!

Jason cuts the song. He says "There are two major problems with this song". My blood pressure has skyrocketed, my heart rate is so high it's like I've sniffed Amyl Nitrate and the blood has drained from my face. I'm now sure I'm going into cardiac arrest and I'm almost welcoming the unconsciousness that will soon release me from this embarrasment. I've failed again!

"There are two major problems with this song - it's not on the radio and my name's not on it". The room breaks into applause. My friends laugh at me. I manage a feeble "woo-hoo" and a shaky unconvincing smile. I feel a sense of relief - almost like managing to pass my driving test or an exam.
It's not until later on when we have a break, when people come up to me to congratulate me and teenagers get my email address that I feel like I've achieved something special.

I guess for myself, songwriting workshops have been a relatively positive thing so far.

Edit: Oh if you want to have a listen: FallingMix3 by Mr Zeberdee

Friday, April 10, 2009

Getting creative with Multi-Band Compressors

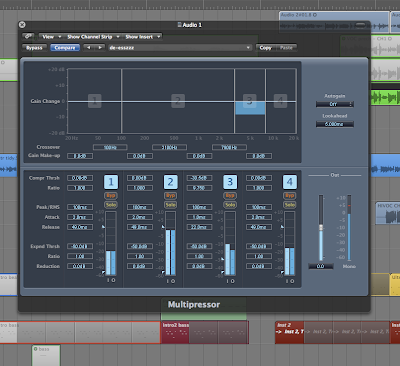
What many people don't realise is that conveniently bundled into each multi-band compressor is a multi-band crossover that splits the overall spectrum into two or more frequency bands - 4 or 5 bands are quite common nowadays.

This gives us the ability to do some cool tricks in our digital audio workstation of choice. For example, having a duplicated instrument track with different crossover bands cut on each track allows us to process different frequencies in different ways for the SAME instrument.

This allows us to add a plugin that might only affect the high frequencies of a guitar or bass without affecting the lows, for example.

All these tricks rely on disabling the compressor part of the plug-in by setting a 1:1 compression ratio (ie no compression) - we only want to use the crossover part of the plug-in.


BASS GUITAR
Say you want to put a flange or chorus on the bass guitar without robbing the bottom-end fatness. Usually inserting delay-based effects on an instrument causes comb filtering, which greatly affects the frequency response over the entire spectrum - with some pretty major frequency cuts going on. This is particularly critical on any instrument where you wish to retain the low frequencies.

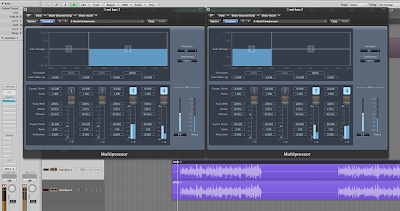
Duplicate your bass region to an extra track then insert a multi-band compressor on both tracks. You really only need two frequency bands for this.

Cut the top band on the "bass" version of the track, and cut the bottom band on the other one that you want to insert the chorus/flange on. This will be inserted after the multi-band plugin by the way.

This assumes that you have your crossover points set the same in each multi-band plug-in. Set the crossover frequency to around 200 Hz for starters, then tune for best effect. Remember - make sure you match this crossover point on both multi-band plug-ins.

Tip - fine-tune the delay time in your chorus or flanger to make it sound the most "musical".


Note that this trick also works really well when adding distortion to a bass - although in this particular case you may want to set up one of your two duplicate bass tracks to distort the entire bass guitar spectrum, and have the other track so it just blends in the clean low bass.

EQ
Another trick - tweaking the "EQ" by boosting and cutting bands rather than using conventional EQ. This is great for just fixing up broad EQ problems - eg too much top or bottom end, but with no real peaky frequencies that need fixed. Using the multi-band keeps the sound smooth.

DE-ESSING
Need to fix a sibilant frequency? Obviously if you have a dedicated De-Esser plug-in, this will probably do the trick, but if you don't have one - try using just a single band on the multi-band compressor instead. Make sure the other bands are set so they don't activate, then set one band between eg 3kHz and 8kHz (use your ears). Stick a high-ish ratio on it (say 8:1), set the threshold quite low; -20dB to -30dB. Tweak to suit.


Note that although de-essing is the most obvious use of this kind of technique, this will also work on other "resonant" frequency problems - perhaps a single bass note that goes wild, or boomy mids on an acoustic guitar.

DJ Hi-and Lo-Cut techniques.
Most DJ mixers have a fairly extreme set of filters built in for completely removing lows or highs from a track. This can be simulated in your DAW by using two duplicate tracks - one with the lower bands cut in the Multi-band compressor, and the other track with the highs cut. Both tracks together should sound like the original, but muting one or the other tracks will apply the "filter". You can of course do this with a matching pair of high and low-pass filters instead - one on each track, but these may not be as "symmetrical" as the multi-band, so both tracks running together may not sound as "pure" as the original.

Any other tricks you know of?

Thursday, April 9, 2009

Making your own reverb Impulses


For those who aren't in the know about Impulse or Convolution reverbs, they take a "snapshot" of the ambience of a room or other space (or even audio equipment) that can then be used within a specialised reverb plug-in. (eg Space Designer, Altiverb, Waves IR1, TL Space, Voxengo Pristine Space, SIR, Nebula)

This gives a scarily accurate reproduction of the space, but it does have it's down sides as well.

It's very heavy on processing power - every bit of each impulse sample has to be processed against every single bit of each audio sample you're putting through it. For 24 bit source and 24 bit impulse that's 24x24=576 calculations for EACH sample. This means impulse reverbs not only suck the power from your computer's CPU, they also have a high latency - and no sound comes out of the other end of the reverb until the first sample gets processed through ALL the samples in the entire impulse. This means if you change a parameter in the reverb plug-in, there's quite a delay before you hear the effect.

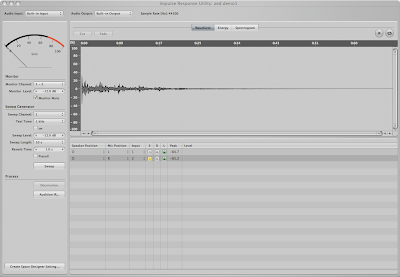
Anyway - enough of the scary maths, let's talk about how to actually make your own impulse "recordings" of rooms. I'm going to focus on using Space Designer in Logic Pro, because Apple have very kindly created an Impulse Utility that makes the whole process stupidly easy - even for making surround-sound impulses if you feel the need.


What we're going to do:

We're going to play a swept tone into a room, record it through a couple of microphones, trim the resulting file and finally deconvolve it into your beautiful reverb patch.
Note: Grabbing responses from equipment is better with a single-full-volume sample "click" rather than a sweep, but a sweep is usually better for spaces because it has better frequency response, and better record levels - watch out for items resonating in the room though!

What we're going to need:
  • A Mac computer with Impulse Utility. A laptop is the most convenient.
  • Good quality audio interface with Mic preamps. With phantom power for the mics.
  • Powered full-range speaker - to feed the swept tone into the room. Bigger is better so you can generate the lowest frequencies and it can fill the room with sound without distorting.
  • At least one good quality microphone - a stereo pair of small-diaphragm condensers is ideal.

Setting up:

The first thing is to set the correct input/output devices.


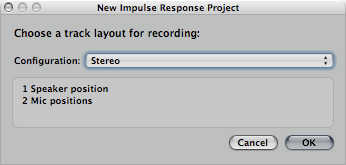
Then decide how many channels you want to record - I'm just using "Stereo" since I'm only using one source speaker (True Stereo is for two speakers/two mics).


Choosing the positioning of the mics and speaker/s is a whole book in itself, but as a starter I recommend you have the speaker next to you at one end of the room (pointing into it), and put the mics two-thirds of the way back, pointing away from the speaker. This avoids direct sound from the source in your reverb patch - giving more room colour. Feel free to record a whole bunch of different combinations if you have the time - there's no right or wrong.

Then you have to send some tone to your speaker to set the playback level. Press the tone button, adjust levels as fast as possible before the tone drives you crazy.


Recording the file:

Arm your track/s. (You could theoretically record each track at different times, for example if you had only one good mic).


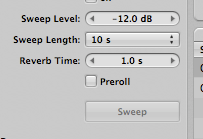
You can set the expected reverb time for the capture - it gets added on at the end of your sweep.
Be very quiet. Shhhh.
Hit the Sweep button. (Where does your hearing cut out on the tone sweep?)


Voila! The Impulse Utility forces you to save the session/captured file now, so you could always finish this later if you have to quickly pack up and escape.

Trimming the resulting impulse:

You'll probably need to trim the silence from the start and end of the impulse file - you'll want a tightly-edited front, and why waste CPU cycles processing any silence at the end?


I recommend you do a fade into silence at the end.
Hardly-know factoid: One of the benefits of trimming the beginning of the impulse file, from a swept tone rather than a click, is that it removes any harmonic distortion that was generated during the process of playing the swept tone. The distortion conveniently ends up BEFORE the impulse click. Awesome.

Auditioning the Impulse:

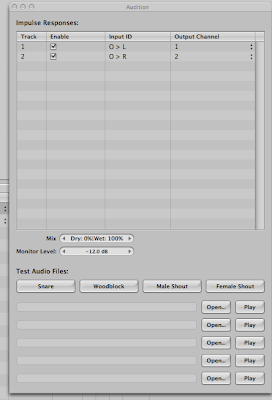
Pressing the Audition IR button will allow you to play some preloaded sounds (or you can load your own waves) through your new reverb to see what it sounds like before saving it as a patch.


Exporting as a Space Designer patch:

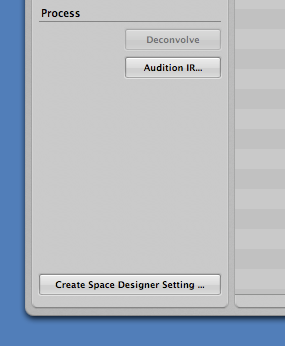
Hit the Create Space Designer Setting button, name your patch, done!


It magically appears in your Space Designer patch list.

Once you've been through this process once, you'll see just how easy it really is, and you'll probably start noticing the reverb sound in stairwells a lot more.

Saturday, April 4, 2009

RTFM! Or not.

Any regular denizen of discussion groups and help forums - especially of a technical nature or having anything to do with software apps etc, will be familiar with this statement.

RTFM! Read the F****** Manual.


Set of Logic Studio Manuals (Photo by Uninen)

Usually it's applied in the context of, why are you here asking this stupid question - haven't you even bothered to read the manual? Loser!

Unfortunately the people who respond in this fashion are the ones who are actually happy reading manuals and love theory. I'm one of these people, by the way. I enjoy reading manuals, and once felt a little of the same scorn towards those who didn't.

But lately, as I've discovered more about education and the way people learn, I've realised that most people struggle to read manuals - in fact there are probably a vast amount of people out there who are happily using software apps who struggle to read anything at all. To deny them support is to discriminate against those who are not on a similar educational or learning level to ourselves. It's elitism, and biased very strongly against newbies who are just starting out.

Do we expect them to read the manual before using the program? I would guess that the amount of people who do that are well in the minority - if they exist at all.

And lets not forget that manuals are not instruction booklets - they are usually dry and written by engineers, or at the least by someone who is so familiar with the program that they may find it hard to remember what it was like to know nothing about it.

It's easy to make assumptions about what the reader already knows, and most manuals alternate between ultra-simplistic first-timer statements like "Thank you for buying this product - this is the "on" button", then cut to hard technical data that only another engineer can decode. As an audio engineer of many years, I have hunted in vain through manuals for typical useful info, only to come away frustrated and annoyed. And occasionally entertained by poor translations, I'll admit.

Now all this isn't to say that we shouldn't recommend people read the manual, as there are people out there who haven't even considered that particular avenue, but we should continually remember that our own learning preferences are not the same as everyone elses, and it shouldn't be considered as a compulsory requirement - just another way to gain information.

Some people may prefer verbal communication, some watching a video of how something works, some might need all that dry information from a manual decoded and spelt out in an easier to understand and simple set of instructions.

Oh - lets ask an expert in a forum!

"RTFM!"

Saturday, February 28, 2009

Five Tips for increasing your Creativity

Creativity flourishes under arduous conditions

It's no secret that some of the most amazing ideas come out at the most stressful or restrictive times and places. History is full of amazing art and writings that came from the most desperate and depressing times.

Even the most procrastinistic (is that even a word?) amongst us has probably found inspiration when having to do a dull or dreary task. "I can't carry on washing these dishes - I have a great melody for a song in my head!"

Lets face it, some of the greatest innovations have come from simple beginnings as a solution to a specific problem, whether it be in war, survival or even space travel.
One of the key concepts to all this is in the amount of parameters that surround a given problem. Tighter, fewer and more defined parameters make it easier to zoom in and locate a solution. This all sounds a bit left-brain, but it works almost exactly the same in the more right-brain creative environment as well.

There are two similar and overlapping concepts in action here - the first is that an environment not apparently conducive to creativity somehow seems to generate ideas. The second is that there needs to be a restriction in options to enable a better flow or focus of ideas.

In regards to creativity, the environment issue might be simply that we desire to do anything other than what we are currently doing. The more distressing or boring the task, the more our minds try to find an escape or some form of internal freedom, especially if our bodies are trapped somewhere. (eg in a meeting at work, on a production line, or even just stuck on a bus or train)

1) Capture the ideas when they flow

One of the key things we can take from this is that we need to have a handy system for capturing those ideas for later use. Some people carry notebooks, some carry voice recorders, some, like me, use their cellphone. Having voicemail on your own phone number can be a handy thing! The cellphone is useful in that nobody can tell who you're talking to - even if it's to yourself ;o)

2) Store ideas for later use and retrieval

This is kind of obvious, really. No point in having all those good ideas if you can't retrieve them later on. This part is a little left-brain again - sorting, storing and keeping an index of some sort. There are apps out there for the computer that can help in this regard. For songwriting I recommend Masterwriter, but there are numerous apps and techniques out there that may suit your own style.

3) Work to a fixed idea.

One example of this is when I was having trouble finding new ideas for writing songs when I was writing a song every week - I canvassed my friends for ideas. One idea I was given was "what if Winter was a woman?" This is a great way to focus your writing, and there's no rules about changing direction once you're going. Use "what if" as much as possible, and remember people love stories.

4) Keep the equipment basic

There are so many people out there who feel that they need to have the latest gear or equipment to get the best sounds or compositions happening. The advent of the internet downloading culture has turned people into software collectors rather than music makers. Some of the most prolific and successful producers of music are not even using the latest technology - they're using vintage equipment that they know intimately and are able to overcome its limitations. Don't keep postponing your real writing until you get the right technology. It's YOU that creates, NOT the technology. (Although occasionally a new sound can trigger off an idea, of course)

5) Limit your creative options to find direction

There are some big traps for composers on modern computer systems - the main one being way too many options. It's hard to find direction when you have the entire compass at your disposal.
When writing a song, it's easy to get bogged down on paltry things like hunting for the perfect patch on a synthesizer, or just the right reverb chamber - and sometimes there are thousands.
It's better to make a call beforehand about the creative palette that you will use - choose the instrumentation or style in advance so you can stay focused.

There you go - this is just a simplistic set of ideas that may help you get past your writer's block. These are not hard and fast rules - in fact there are no rules, apart from rule-of-thumb, and there's exceptions to everything.

I was just now wondering whether it's the reduction in hardship that impacts on bands and artists who have trouble with their later efforts in music - the first album is born of struggle and turmoil, but later efforts have more funding, more time, better studios etc - maximising their quality but reducing their creativity. Just thinking out loud really.

Monday, February 9, 2009

No bass out of your home stereo?

I don't know how many times I visit friends' places or go to parties and their stereo speakers are out of phase. Even worse - they don't even seem notice how horrible they sound.
They're probably so used to it that they think that's what the system's MEANT to sound like.

As an audio engineer, I can usually tell straight away and it drives me crazy. Usually so crazy I can't even even pay attention to what people are saying or even enjoy my drink until I fix it.

How can you tell the speakers are out of phase?
There's a distinct lack of bass frequencies (that's the low rumbly ones), unless you're close to one speaker only.
When you walk across from one speaker to the other, parts of the song seem to follow you, or "swim".
It feels like there's a "hole" in the sound in between the two speakers.

Here's the easy test.
Move both of the speakers together, side by side. Is there more or less bass?

If there's more bottom-end, then it's usually all good.*

If the sound gets thin and harsh, then your speakers are out of phase.

How to fix it? Easy.
1) Turn OFF your stereo.
2) On the back of ONE of the speakers swap the two wires.
3) Power up and enjoy a better sound!

*Sometimes, on a Friday at five minutes before the end of work, an apprentice speaker assembler can solder the wires around the wrong way on only ONE of the speakers in your speaker box. This makes it a nightmare to figure out what's wrong, and takes some higher-tech equipment to analyse.

Saturday, February 7, 2009

My Top 5 Essential Plugins

Everybody has their own favourites, and here's mine right at the moment. (It may change next week!)

Melodyne Plug-In

Because I write and produce completed demos so fast (up to a song a week for a quite a while), I'm often generating vocals from one pass. Or starting my song idea from a sung vocal.
So Melodyne is awesome for tweaking what I already have, or changing to a different key. Or generating harmony ideas. Or fixing poor bass playing and intonation (most basses have poor intonation on certain frets).
Unlike Autotune, it preserves vibrato and pitch slides, is fantastic for stretching notes or fixing phrasings, and doesn't create that odd phasing sound when it's inserted.
People have the wrong idea about apps like Autotune and Melodyne - sure they can be, and are, abused by talentless losers, but they are also essential tools when it comes down to a choice between a perfect emotive delivery marred by a wrong note, or a technically pitch-perfect and soul-less performance. Give me the first option anytime.


Izotope Ozone 4

Long considered as the perfect all-in-one mastering tool for the semi-pro or lower-budget mastering engineer, this version has taken another step in the pro direction with the addition of mid-side processing options and a slew of other cool features. One of the highlights for me is the ability to solo a frequency by option-clicking in the EQ window. It's seldom I have to pull in other plugins or external processing to complete a mastering job.


Logic's Compressor

Wow - with the advent of Logic 8, they have really upgraded this plugin significantly. It now models five new types of compressor, including two class-A types (including Urei), VCA, FET, and Opto. My favourites are the Urei and the FET. It has some cool extra features - overload clip type, EQ on the sidechain (for frequency-selective reduction), and a "mix" slider. This last is way more powerful than you can imagine - with just a tweak of this you can easily recreate parallel compression within the channel signal path - set the compressor to "smash" settings and then mix it back a bit.


Arts Acoustic Reverb

This is a digitally generated reverb effect rather than one of the currently popular impulse-based units, but somehow it it just sounds great. It has plenty of parameters to tweak and almost every patch has that beautiful analogue quality to it. Low on the computer resources too. Try it - you'll like it.


Logic's Tape Delay

Okay, now Logic has the new Delay Designer - it's flashy and cool. But I still love the ol' Tape Delay. It does the most awesome dub effects, and is just made for tweaking as the mix progresses. It has filters that work on the feeback section so that each echo progressivley grunges out more and more, and an authentically perfect feedback that goes crazy in a sweet analogue way when you wind up the feedback slider.

So what are YOUR favourites?

Wednesday, February 4, 2009

Basics for a home songwriting studio

In it's purest sense, you can write a song with nothing but your own brain. If you can hear the music in your head and craft the lyrics, you're away laughing.

The tricky bit is getting those ideas into a form that other people can appreciate.

So I've built up a basic recording system at home, refined over the years, so I can get my ideas down as quickly and easily as possible, and with enough quality that I can do commercial work, including mastering jobs.

The core of it is my Apple MacBook Pro.

There's a bunch of good reasons for having a laptop, not the least of which it's almost always with you so if you suddenly have a great idea you can act on it, or if you're stuck in the airport or on a plane, you can be editing or mixing. I upped my RAM to 4GB so everything would run smoothly - you want at least 3GB nowadays for audio really. It wasn't long ago that the humble laptop wasn't powerful enough for recording and mixing, but with the new generation of Intel multi-core Macs, they compare well to tower systems.

I originally chose Apple because I prefer to use Logic Pro as my writing and recording application (since I've been using the product since it was Emagic Creator on Atari), and you HAVE to run it on a Mac. With an Intel Mac you can run Windows as well, so I have the best of both worlds.

Logic has a Caps-Lock keyboard which is really handy for playing in notes from the computer keyboard when you're out and about, and is really aimed at song writing and production, so it has heaps of software instruments and loops built-in.

Since you don't really want to be using the built-in sound on your computer for recording, and you may need multiple inputs or phantom power for condenser microphones, in my studio I have a Presonus Firestudio which I have everything plugged into, ready to record at a moment's notice. The Fireport also has a MIDI in/out port built in, which is handy.

For recording, I have one decent microphone which I use for pretty much everything - it's an Avantone CV-12 valve large-diaphragm condenser. It's a beauty. It cost me about $700. It's 9-position multi-pattern and comes with a spare valve (for tweaking the sound of the microphone) and a suspension cradle. For the price, it sounds awesome.

Although it's not an essential, I have a Drawmer 1960 dual valve preamp/compressor which I have the Mic permanently plugged into. It's a fantastic preamp for vocals and mastering.

For listening, I have a few different sets of headphones and a pair of Mackie HR824 monitors. I used to have some small Genelecs and a sub, but getting the position accurate for a sub is a real nightmare, so I changed to the Mackies which have really good low-end response without using a sub. I do a fair bit of mastering through these and they're relatively flat.

I also have an old Yamaha CS1x synthesiser, which I mainly use for sending MIDI to Logic Pro so I can record and play the built-in software instruments. It's got some great sounds of it's own though, which I probably don't use enough.


With this setup, I can get sounds down really fast while I'm inspired or just suddenly have a great idea. The most I usually have to do is quickly plug the laptop into the Presonus via a handy firewire cable, and it's all go.

Welcome!

I've been so busy writing songs in the last couple of years that I haven't had time to update my blog - in fact I closed down my last blog since I wasn't using it and it got ridiculously out of date.
I was writing a song a week for quite a while, and although I had quite a few hiccups due to my "real" job cropping up and demanding my time, I've managed to average out to between two or three weeks per demoed song.

Now I feel like it's time to share some of my skills in getting song sketches and demoes down really fast while the ideas are flowing.

Most songwriters seem to write on their instrument of choice - might be guitar or might be piano. I'm pretty average on guitar and piano - well let's not even talk about that.
Anyway I tend to use them in a supporting rather than major role in my songwriting.

I also tend to veer into the electronica on occasion, but I'm most interested in the song itself, and it might take any style that suits.

So welcome along to my blog about some ways to create and demo songs.