I just spent the weekend at a songwriting workshop by Jason Blume. It was awesome.
This is the second one I've participated in, and to be honest because I'd helped organise my workplace to host the workshop, I got to go for free.
I'd always been a bit hesitant about going along to workshops and training seminars about songwriting, because I always figured "I don't want somebody to give me rules that I have to stick to - I want to make my own ORIGINAL music, maaaan" (That last because I'm kind of whining as I think that).
This is also why I resisted learning music theory ;o)
Anyhoo - now that I've been to a few of these things, I realise that they DON'T rob you of your unique voice and creative centre - in fact it's more liberating if anything, because one of the main things that Jason expounds is that there are no rules. You can make whatever music you want, and it's all great.
However - he is a storehouse of astute observations about songwriting (as well as the music and song publishing industries). So rather than saying what is right and what is wrong, he will point out that most of the popular songs have certain things in common - for example a chorus that has a memorable melody and lyric, and that can deliver an appropriate emotional reaction.
Jason will not tell you how to write your chorus, but he might certainly observe that it doesn't really sound different from the verse, or that the song drops rather than lifts at that point, or the words or phrasing don't't make sense, or something along those lines.
He also makes a distinction between songs written by people for their own pleasure, and those who write for the public - if you are writing for yourself feel free to do whatever you want, if you are doing it for others, then it's probably good to make it easy for them to engage with, and hopefully remember your song.
One of the most interesting things Jason does is to critique songs that people bring along to the workshop (either on CD/iPod or playing them live).
This is a real eye-opener, as you can see and hear yourself all the flaws in other people's (and your own!) submissions, especially by the end of the second day, where you are more aware of the aspects to look for.
It becomes obvious that a good song not only has to be a unique, creative and detailed viewpoint of something, but also needs to be well-crafted to highlight its own good points rather than destroy them.
After so many meandering singer-songwriter instrospectives (I've been guilty of doing this for many years as well), it's actually refreshing to hear simplicity and repetition. Half the problem is that everybody wants to be "clever", and instead they end up with cumbersome and meandering and forgetful.
Last year my own submission, which of course I was sooooo proud of - (then my current latest and greatest!), was exposed as having three different verses that all had different structures, and lyrics that mostly failed to be a unique way to say what I wanted to say. It was true - it wasn't a bad song by any means, but all you songwriters out there must know what it feels like to play your song to somebody and hear it though their ears as you listen? I was cringeing.
Over the last year I have taken on board a lot of what Jason taught me at the last workshop - I had written what I felt was a much better song - simpler verses, more repetitive, stronger melodies, a great chorus line. But I was anxious about the verse lyrics, having already thrown them all away a couple of times already and going back almost to the original idea. The lyrics still needed a lot of work to create a solid setup for the choruses, though.
A couple of the lines were even the original scratch lines I jammed along to it when I was first writing the song. One line was a complete throw-away and a bit of a joke. "Check one-two". Whaaaat?
I had hoped to fix a couple of these lines before the second day of the workshop - but some problems with an Apple OSX update corrupted my Logic song session, so I had to submit it as it was.
I actually began to regret putting my song in the submission pile - as the stack grew shorter towards my own disc I grew more and more nervous. "Check one-two!?!?!!" Oh my god, what a stupid line!
Finally, Jason worked down to my own submission. My heart was racing. He put my lyrics up on the projector. There were some snickers and giggles - oh the humiliation!
He flipped the disc in the player and hit play.
Doesn't sound toooo bad, nice hooky intro rhythm, clean verse lines (Argh those lyrics! Argh I hate the sound of my own voice). Kicks up into the pre-chorus, then bang into the chorus - phew - relatively safe. Then suddenly STOP!!!!!!
Jason cuts the song. He says "There are two major problems with this song". My blood pressure has skyrocketed, my heart rate is so high it's like I've sniffed Amyl Nitrate and the blood has drained from my face. I'm now sure I'm going into cardiac arrest and I'm almost welcoming the unconsciousness that will soon release me from this embarrasment. I've failed again!
"There are two major problems with this song - it's not on the radio and my name's not on it". The room breaks into applause. My friends laugh at me. I manage a feeble "woo-hoo" and a shaky unconvincing smile. I feel a sense of relief - almost like managing to pass my driving test or an exam.
It's not until later on when we have a break, when people come up to me to congratulate me and teenagers get my email address that I feel like I've achieved something special.
I guess for myself, songwriting workshops have been a relatively positive thing so far.
Edit: Oh if you want to have a listen: FallingMix3 by Mr Zeberdee
Monday, May 18, 2009


Friday, April 10, 2009
Getting creative with Multi-Band Compressors
What many people don't realise is that conveniently bundled into each multi-band compressor is a multi-band crossover that splits the overall spectrum into two or more frequency bands - 4 or 5 bands are quite common nowadays.
This gives us the ability to do some cool tricks in our digital audio workstation of choice. For example, having a duplicated instrument track with different crossover bands cut on each track allows us to process different frequencies in different ways for the SAME instrument.
This allows us to add a plugin that might only affect the high frequencies of a guitar or bass without affecting the lows, for example.
All these tricks rely on disabling the compressor part of the plug-in by setting a 1:1 compression ratio (ie no compression) - we only want to use the crossover part of the plug-in.
BASS GUITAR
Say you want to put a flange or chorus on the bass guitar without robbing the bottom-end fatness. Usually inserting delay-based effects on an instrument causes comb filtering, which greatly affects the frequency response over the entire spectrum - with some pretty major frequency cuts going on. This is particularly critical on any instrument where you wish to retain the low frequencies.
Duplicate your bass region to an extra track then insert a multi-band compressor on both tracks. You really only need two frequency bands for this.
Cut the top band on the "bass" version of the track, and cut the bottom band on the other one that you want to insert the chorus/flange on. This will be inserted after the multi-band plugin by the way.
This assumes that you have your crossover points set the same in each multi-band plug-in. Set the crossover frequency to around 200 Hz for starters, then tune for best effect. Remember - make sure you match this crossover point on both multi-band plug-ins.
Tip - fine-tune the delay time in your chorus or flanger to make it sound the most "musical".
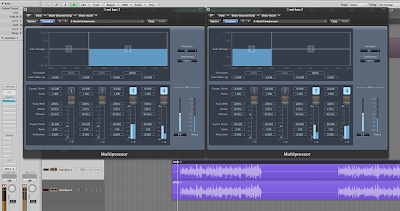
Note that this trick also works really well when adding distortion to a bass - although in this particular case you may want to set up one of your two duplicate bass tracks to distort the entire bass guitar spectrum, and have the other track so it just blends in the clean low bass.
EQ
Another trick - tweaking the "EQ" by boosting and cutting bands rather than using conventional EQ. This is great for just fixing up broad EQ problems - eg too much top or bottom end, but with no real peaky frequencies that need fixed. Using the multi-band keeps the sound smooth.
DE-ESSING
Need to fix a sibilant frequency? Obviously if you have a dedicated De-Esser plug-in, this will probably do the trick, but if you don't have one - try using just a single band on the multi-band compressor instead. Make sure the other bands are set so they don't activate, then set one band between eg 3kHz and 8kHz (use your ears). Stick a high-ish ratio on it (say 8:1), set the threshold quite low; -20dB to -30dB. Tweak to suit.
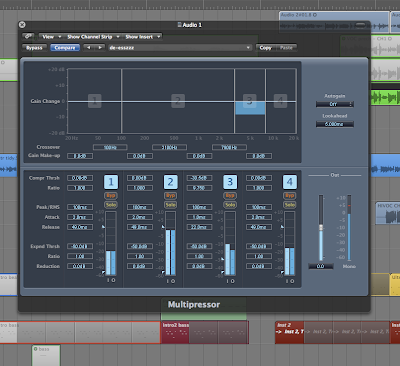
Note that although de-essing is the most obvious use of this kind of technique, this will also work on other "resonant" frequency problems - perhaps a single bass note that goes wild, or boomy mids on an acoustic guitar.
DJ Hi-and Lo-Cut techniques.
Most DJ mixers have a fairly extreme set of filters built in for completely removing lows or highs from a track. This can be simulated in your DAW by using two duplicate tracks - one with the lower bands cut in the Multi-band compressor, and the other track with the highs cut. Both tracks together should sound like the original, but muting one or the other tracks will apply the "filter". You can of course do this with a matching pair of high and low-pass filters instead - one on each track, but these may not be as "symmetrical" as the multi-band, so both tracks running together may not sound as "pure" as the original.
Any other tricks you know of?
This gives us the ability to do some cool tricks in our digital audio workstation of choice. For example, having a duplicated instrument track with different crossover bands cut on each track allows us to process different frequencies in different ways for the SAME instrument.
This allows us to add a plugin that might only affect the high frequencies of a guitar or bass without affecting the lows, for example.
All these tricks rely on disabling the compressor part of the plug-in by setting a 1:1 compression ratio (ie no compression) - we only want to use the crossover part of the plug-in.
BASS GUITAR
Say you want to put a flange or chorus on the bass guitar without robbing the bottom-end fatness. Usually inserting delay-based effects on an instrument causes comb filtering, which greatly affects the frequency response over the entire spectrum - with some pretty major frequency cuts going on. This is particularly critical on any instrument where you wish to retain the low frequencies.
Duplicate your bass region to an extra track then insert a multi-band compressor on both tracks. You really only need two frequency bands for this.
Cut the top band on the "bass" version of the track, and cut the bottom band on the other one that you want to insert the chorus/flange on. This will be inserted after the multi-band plugin by the way.
This assumes that you have your crossover points set the same in each multi-band plug-in. Set the crossover frequency to around 200 Hz for starters, then tune for best effect. Remember - make sure you match this crossover point on both multi-band plug-ins.
Tip - fine-tune the delay time in your chorus or flanger to make it sound the most "musical".

Note that this trick also works really well when adding distortion to a bass - although in this particular case you may want to set up one of your two duplicate bass tracks to distort the entire bass guitar spectrum, and have the other track so it just blends in the clean low bass.
EQ
Another trick - tweaking the "EQ" by boosting and cutting bands rather than using conventional EQ. This is great for just fixing up broad EQ problems - eg too much top or bottom end, but with no real peaky frequencies that need fixed. Using the multi-band keeps the sound smooth.
DE-ESSING
Need to fix a sibilant frequency? Obviously if you have a dedicated De-Esser plug-in, this will probably do the trick, but if you don't have one - try using just a single band on the multi-band compressor instead. Make sure the other bands are set so they don't activate, then set one band between eg 3kHz and 8kHz (use your ears). Stick a high-ish ratio on it (say 8:1), set the threshold quite low; -20dB to -30dB. Tweak to suit.

Note that although de-essing is the most obvious use of this kind of technique, this will also work on other "resonant" frequency problems - perhaps a single bass note that goes wild, or boomy mids on an acoustic guitar.
DJ Hi-and Lo-Cut techniques.
Most DJ mixers have a fairly extreme set of filters built in for completely removing lows or highs from a track. This can be simulated in your DAW by using two duplicate tracks - one with the lower bands cut in the Multi-band compressor, and the other track with the highs cut. Both tracks together should sound like the original, but muting one or the other tracks will apply the "filter". You can of course do this with a matching pair of high and low-pass filters instead - one on each track, but these may not be as "symmetrical" as the multi-band, so both tracks running together may not sound as "pure" as the original.
Any other tricks you know of?
Thursday, April 9, 2009
Making your own reverb Impulses

For those who aren't in the know about Impulse or Convolution reverbs, they take a "snapshot" of the ambience of a room or other space (or even audio equipment) that can then be used within a specialised reverb plug-in. (eg Space Designer, Altiverb, Waves IR1, TL Space, Voxengo Pristine Space, SIR, Nebula)
This gives a scarily accurate reproduction of the space, but it does have it's down sides as well.
It's very heavy on processing power - every bit of each impulse sample has to be processed against every single bit of each audio sample you're putting through it. For 24 bit source and 24 bit impulse that's 24x24=576 calculations for EACH sample. This means impulse reverbs not only suck the power from your computer's CPU, they also have a high latency - and no sound comes out of the other end of the reverb until the first sample gets processed through ALL the samples in the entire impulse. This means if you change a parameter in the reverb plug-in, there's quite a delay before you hear the effect.
Anyway - enough of the scary maths, let's talk about how to actually make your own impulse "recordings" of rooms. I'm going to focus on using Space Designer in Logic Pro, because Apple have very kindly created an Impulse Utility that makes the whole process stupidly easy - even for making surround-sound impulses if you feel the need.
What we're going to do:
We're going to play a swept tone into a room, record it through a couple of microphones, trim the resulting file and finally deconvolve it into your beautiful reverb patch.
Note: Grabbing responses from equipment is better with a single-full-volume sample "click" rather than a sweep, but a sweep is usually better for spaces because it has better frequency response, and better record levels - watch out for items resonating in the room though!
What we're going to need:
- A Mac computer with Impulse Utility. A laptop is the most convenient.
- Good quality audio interface with Mic preamps. With phantom power for the mics.
- Powered full-range speaker - to feed the swept tone into the room. Bigger is better so you can generate the lowest frequencies and it can fill the room with sound without distorting.
- At least one good quality microphone - a stereo pair of small-diaphragm condensers is ideal.
Setting up:
The first thing is to set the correct input/output devices.

Then decide how many channels you want to record - I'm just using "Stereo" since I'm only using one source speaker (True Stereo is for two speakers/two mics).

Choosing the positioning of the mics and speaker/s is a whole book in itself, but as a starter I recommend you have the speaker next to you at one end of the room (pointing into it), and put the mics two-thirds of the way back, pointing away from the speaker. This avoids direct sound from the source in your reverb patch - giving more room colour. Feel free to record a whole bunch of different combinations if you have the time - there's no right or wrong.
Then you have to send some tone to your speaker to set the playback level. Press the tone button, adjust levels as fast as possible before the tone drives you crazy.

Recording the file:
Arm your track/s. (You could theoretically record each track at different times, for example if you had only one good mic).

You can set the expected reverb time for the capture - it gets added on at the end of your sweep.
Be very quiet. Shhhh.
Hit the Sweep button. (Where does your hearing cut out on the tone sweep?)

Voila! The Impulse Utility forces you to save the session/captured file now, so you could always finish this later if you have to quickly pack up and escape.
Trimming the resulting impulse:
You'll probably need to trim the silence from the start and end of the impulse file - you'll want a tightly-edited front, and why waste CPU cycles processing any silence at the end?

I recommend you do a fade into silence at the end.
Hardly-know factoid: One of the benefits of trimming the beginning of the impulse file, from a swept tone rather than a click, is that it removes any harmonic distortion that was generated during the process of playing the swept tone. The distortion conveniently ends up BEFORE the impulse click. Awesome.
Auditioning the Impulse:
Pressing the Audition IR button will allow you to play some preloaded sounds (or you can load your own waves) through your new reverb to see what it sounds like before saving it as a patch.

Exporting as a Space Designer patch:
Hit the Create Space Designer Setting button, name your patch, done!

It magically appears in your Space Designer patch list.
Once you've been through this process once, you'll see just how easy it really is, and you'll probably start noticing the reverb sound in stairwells a lot more.
Subscribe to:
Posts (Atom)