Hi,
I've decided to set up my own web sites over at zedbrookes.co.nz and BrookesAudioDesign.co.nz and am currently in the process of transferring all the contents of this blog over to those. The Brookes Audio Design site is more audio tech-y, while the Zed Brookes one is more music creativity-based.
Feel free to pop over for a visit!
zed
Wednesday, November 7, 2012
Friday, October 19, 2012
Thunderbolt arrives for the UAD Apollo - huzzah!
 |
| A large box for a small card. That image of the card is pretty close to "actual size" |
 |
| There's a lot of chippage going on in this little card. |
That means I can now use the fancy little Thunderbolt port on my Mac Book Pro instead of the Firewire 800 port.
 |
| So much simpler - only three cables needed now. |
So what are the benefits?
Thunderbolt has blisteringly fast bandwidth compared to Firewire
That means there are virtually no bandwidth limitations on the number of Apollo-hosted UAD plugins you can use. This wasn't too much of a problem with Firewire anyway - unless you wanted to share your Firewire port with, say, an external hard drive. Which you tend to do quite a bit when you're recording/mixing music.
Thunderbolt gives way lower latency times than Firewire - I can now run Logic quite happily with a 32 sample buffer, (as long as my project isn't too huge). It used to choke a bit before.
I've also noticed Logic feels a little snappier and more responsive when starting/stopping playback, and the songs load and close slightly faster - perhaps due to the UAD plugins loading and unloading faster. Perhaps it's just my imagination - further testing will reveal whether this is the case.
I also haven't taken the time to check out the higher sample rates yet.
Convenience
A cool thing about Thunderbolt is that it's daisy-chainable (as is Firewire, by the way).
But what I particularly like about it is that I can plug my laptop into the Apollo's new Thunderbolt port, and then there's still a second Thunderbolt port on the card which I can then plug into my studio's LCD monitor - just using my usual laptop DVI-VGA adaptor. Magic.
Even better - the two Firewire 800 ports on the back of the Apollo now become a Firewire hub, so one of the ports can now be plugged into my external Firewire hard drive - and it all goes through the Thunderbolt cable into my laptop.
So that little skinny little Thunderbolt cable is handling audio going to and from the Apollo, UAD plugin data going to and from the Apollo, video being sent to my studio LED monitor, and data to and from my external hard drive. That's a lot of stuff going on.
For me, convenience is a big thing. I want a simple, tidy connection setup - especially as I use my laptop as my main studio computer and want to be able to come home and plug it into my studio setup with a minimum of fuss. As you can see, Thunderbolt does this really well.
Installation
This was easy - unplug the Apollo's power, use the included allen key to take the little slot cover off the back of the Apollo (make sure to remove any static from yourself), then slide in the Thunderbolt card. Put the screws back in. Plug the power back in, connect Thunderbolt cable and turn it on. Took about 2 minutes.
It showed up in the computer exactly the same as before, but without the Firewire bandwidth meter and settings in the Apollo Control Panel.
Note that you will have to update your UAD software and the firmware in the Apollo before fitting the card if you haven't already (I had). You also can't connect to your computer with Firewire AND Thunderbolt at the same time. It doesn't like it, apparently.
Downsides
Expense. It's currently about $700NZ for the interface card - I think that's still a little over-priced, but perhaps the price will drop as they produce more of them.
Thunderbolt cables are also a little expensive at the moment - $78NZ for a 2-metre cable.
Ouch. Still - not as bad as the first Firewire cable I ever bought - that was $300NZ!
Also - for those that didn't go and check out the Thunderbolt links at the top - the cables are in part so expensive because they have circuitry in each of the connectors so they can combine (and then separate at the other end) the video and the data.
Conclusion
Most people will probably find that the Apollo is just fine with the existing Firewire 800 option.
Those who are pushing the limits of their setup all the time (like I am!), or want ultra-low latencies for tracking, or who prefer a simple and tidy studio cabling setup, would definitely benefit from this Thunderbolt card.
And as more and more Thunderbolt-compatible devices become available, the convenience of being able to daisy-chain all these devices together will be even more of a priority.
Sunday, October 14, 2012
3 Common Mistakes in Lyric Writing
As a producer, one of the things that is most apparent to me is the difference between an amateur and professional songwriter - even if that amateur is talented and doing well in their career. Many bands and artists come into the studio with what initially seems to be a great song, but in the process of putting down the vocals, it can become increasingly apparent that the lyrics have not had the same level of development (or writing expertise) as the rest of the song, often with basic mistakes that can leave an otherwise excellent song fundamentally flawed.
Lyric-writing is a craft as well as an art - words have more or less power and meaning depending on the order and context in which they are conveyed, and knowing some tricks to getting the maximum impact (and least amount of song self-destruction) from your lyrics should really be of high priority. Of course, there are no "rules" in writing, but there are observable effects on the listener depending on how you construct the lyric, and you can simply choose to use these tools or not.
Here's my three worst contenders for shooting yourself in the lyrical foot.
1) Don't use perfect rhymes
This is probably the most amateur mistake of all.
Try to use other types of rhymes instead - eg family rhymes, internal rhyme, additive, subtractive, assonance or consonance rhymes.
Although a part of our brain always desires perfect rhyme, we have come a long way since the early days of songwriting, and all those obvious perfect rhymes have been so well-used that they are now totally cliched and too-predictable.
Get yourself a rhyming dictionary (there are online versions too, although I prefer the MasterWriter app) and choose rhymes that are less obvious and maybe pleasantly surprising. Instead of using the perfect rhyme "Bread" and "Head", maybe use a family rhyme - eg "Bread" and "Web" or "Tear". In singing, we generally tend to rhyme vowel sounds, and the consonants matter less. Check out books/articles/workshops by lyric guru Pat Pattison for more details on rhyme types.
Note that sung rhymes are not usually the same as written rhymes, so make sure you sing them as you write to make sure that they ARE singable.
2) Use "spotlighting" effectively
There are natural accents within a musical bar that will automatically highlight or spotlight to the listener any word or syllable placed upon it. These spotlights tend to be on the downbeats of the bar, plus a big one at the end of a line, and even bigger at the end of a verse.
Ignorance of this behaviour means that you may end up with "nothing" words like "the", "and" or "but" placed on these prize positions in the bar rather than your cool meaningful words.
This risks weakening your lyric and can even undermine the meaning of it by placing importance on the wrong word.
Back in 2007 I wrote a song, just before going to a Pat Pattison workshop, that included this lyric:
"The tide is slowly rising, Blood red sun on the horizon"
Spotlighting these words:
Tide, slow, rise, bloodred, sun, the, horizon.
Notice how "the" has a spotlight that it really doesn't deserve?
I fixed it in this example by removing it from the spotlighted position:
"The tide is slowly rising, Blood red sun on ....the horizon"
Here's the link if you want to listen (warning - ultra-demo quality!): Tied up in Knots
Note also that "rising" and "horizon" rhyme when sung.
And in relation to syllable position:
3) Don't put the "emPHAsis on the wrong sylLAble"*.
As much as possible, try to sing as you would normally speak in conversation. If you don't, you risk breaking the meaning of what you are trying to get across, and it can sound contrived, amateurish, or just like you haven't taken the time to make the lyric fit the music properly.
You should be able to read your song lyrics out, spoken-word fashion, and the phrasing shouldn't be too far away from how you sing it. Or vice-versa. This is most noticeable when you're going for an "authentic"-style delivery (rock/blues/indie) rather than stylised (r'n'b, soul, pop) - accenting the wrong syllable can instantly break authenticity. The listener will go "huh?" and the flow and belief is broken.
There are many more lyrical tips than this, of course, and some equally or more important, but the best idea is to do a proper workshop or short course on it, or at least get a decent book or two about how to structure your lyrics.
For those of you who balk at being told what to do - I remind you that these are not rules as such - they are simply based on observable effects on a listener, and you can still go ahead and do whatever you want.
Sometimes you might need to make a call between including a word that adds the perfect meaning to your lyric, and having to jam it in there a bit more clunkily since it doesn't quite fit. But you should definitely be aware of the risks on how the listener will receive and decode your meaning when you decide to do things like this.
And finally - you should ALWAYS use some kind of rhyming dictionary - otherwise you are relying on a choice of only the rhymes that you can currently remember. Which is often only a small fraction of the huge amount of available rhymes - many of which are probably more interesting than the one you can currently think of.
*As spoken by Mike Myers in "A View From the Top".
References:
Pat Pattison: Essential Guide to Rhyming (Formerly titled Rhyming Techniques and Strategies) Berklee Press, distributed by Hal Leonard January, 1992
You can order all these three books - Writing Better Lyrics (second edition), Essential Guide to Rhyming and Essential Guide to Lyric Form and Structure for a special price here
Jason Blume: Writing Hit Lyrics with Jason Blume - get the book here
Sunday, August 5, 2012
Review - the UAD Apollo Duo
 |
| UAD Apollo under laptop with heaps of UAD plug-ins showing |
So when UAD's Apollo emerged as their new flagship product, I was excited (and after 25-odd years in the music industry, I don't get excited by much anymore). Not only did the Apollo come with some reputedly rather nice preamps, it contained either a Duo or Quad SHARC chipset for running UAD's rather tasty plug-ins as well. Even better, you could have some of those UAD plug-ins in between those preamps and your DAW. This means you could have the virtual equivalent of a very expensive vintage tracking chain of effects with a usefully-low recording latency. That's pretty damn cool.
So I managed to get my hands on an Apollo Duo for a try-out (Thanks Leon at NZ Rockshop!) since all the Quads sold out instantly in NZ on hitting the shores.
A big potential selling point for me was that the Apollo is supposed to be able to be fitted with Intel's new Thunderbolt interface. (More here) This involves purchasing an extra add-on card which hasn't been released yet at the time of publishing, but I really look forward to checking out the performance when these become available. The Thunderbolt transfer speeds are supposed to be blisteringly-fast - actually similar to connecting directly to the PCI-express port on your computer (and there's two channels of that per Thunderbolt port). This means even lower latencies between the interface and the computer, with none of the Firewire-bus wrangling. This is really only an issue anyway if you have external Firewire drives daisy-chained to the Apollo.
UAD have a solid reputation in the audio industry - they make great "vintage"- quality hardware, and have also pretty much nailed the "accurately-modelled vintage studio hardware" DAW plug-in market. I have found the UAD version of classic vintage units such as the Pultec and LA-2A to be several steps above other versions I have tried. They model each component of prized representative units of vintage hardware to capture all the non-linearity that made the originals so musical and desirable. Then they add any extra handy functions to make them slightly more usable in modern DAW production.
As you can imagine, all this extremely detailed modelling takes a ridiculous amount of extra processing power - hence needing some heavy-duty plug-in engines to do all the hard work. This is why UAD plug-ins only run in UAD hardware (and no doubt also for copy-protection reasons). Although you can buy duo or quad-chipped UAD Firewire and internal PCIe units, the Apollo conveniently includes the chips in this tasty preamp/audio interface unit.
 |
| Apollo Front Panel |
Power is supplied through a fairly chunky external power pack that handles the various international voltages.
 | |
| Apollo Rear Panel |
The Burr-Brown preamps are very nice - high gain, quiet and very transparent. Luckily you can insert some UAD plug-ins between the preamps and the DAW inputs to colour this sound should you wish.
In fact, as I hinted at earlier, this is one of the other major selling points of this unit - the ability to put a chain of UAD plugins in between your microphone, guitar or bass and the input of your DAW. For those of us that like to commit immediately to a particular sound, and can't afford the luxury of racks of vintage analog gear, this is a godsend. Of course this is only useful if the recording latency is low enough to be usable, and in this case it is - only a couple of milliseconds in total. Saying that - there was still a little wrangling of monitor sources in the DAW to avoid the ol' comb-filtering effect of two sources with different latencies.
I look forward to seeing what the recording latency is like in the Thunderbolt-interface version of the unit when it becomes available. It means bringing it down to latencies that are very close to using the old Pro Tools HD hardware - less than 1 millisecond. That's pretty darn good.
Okay, so far everything looks pretty good - there's not much to fault in this unit really.
I would say that the only niggles are in the software/firmware.
My first issue was with the combination of the Apollo and my old UAD-2 Solo/Laptop card. Since my trial Apollo unit was only a Duo, I thought, "ah, I've still got my little Solo/Laptop card as well, so that's three processors - not too far off four".
While this was true in theory - it didn't immediately work in practice. I discovered there are some "quirks" with laptop cards. Cardslots in general have always been a little quirky - although in theory it's fine to hot-plug certain devices into the guts of a computer while it's running (and the Solo/Laptop by itself usually seemed to handle it okay) - it's really pushing the technology/software/OS towards their limits. I found that with the combination of the two devices, I was getting some UAD plug-in overload messages opening up old Logic sessions with UAD plugs inserted.
Anyway - the friendly and patient support guy at Universal Audio helped me troubleshoot it on the phone, and it turns out that as long as the Solo/Laptop card is plugged-in before booting up the laptop (so it shows up first in the hardware list in the UAD Control Panel), and then the Apollo is plugged in/turned on afterwards, everything works just dandy. Any loaded UAD plug-ins in the session are now distributed over all the available SHARC chips. Sorted.
Another minor annoyance I found was with the implementation of the plug-ins within the Console app - you can't drag and drop the plug-ins into a different order - you have to cut and paste etc. A bit fiddly when you're wearing a guitar and trying to quickly get something tracked while the idea's hot.
The Console plug-in is modelled on an analog console, with its own built-in effects sends and returns and headphone sends. It allows some nice low-latency patching of monitoring effects like reverb and delay, but it doesn't include the more obvious ability to patch any input to any output like most audio interface mixer apps. This is offset somewhat by each of the various ins/outs within the Console app showing up in your DAW as ins/outs, but is not what you would call "conventional" or transparent operation. Especially if trying to set up multiple headphone sends, each with a different mix.
There's no beat-clock for UAD effects that depend on session tempo either - I can see why this is difficult to include as the Console app sits external to your DAW session - but perhaps having the facility to accept MIDI clock via a virtual MIDI port would be valuable. (UAD boffins - maybe this could be implemented via the Console plug-in?) Having beat-synced delays is important whilst tracking to a song with delay-based effects.
I'd also like to see the ability to map MIDI controllers to various Console parameters/UAD plug-in parameters.
It's not all niggles though - there's a handy plug-in version of the Console for remembering the settings as part of your project - nice! And the Console app allows the easy copy/pasting of your channel mix settings to your effects/headphone sends - very handy!
Review of features
Sound quality; I couldn't fault it. This is a very nice unit. Very low noise and no obvious colouration in the mic preamps. Plenty of gain. Full 48 V Phantom power for mics. Pad, low cut and phase switches. All controlled by a fancy rotating knob with surrounding lit ring showing current gain, and some selector buttons.
I tried recording and playback at various sample rates up to 192kHz. I didn't find that much difference between them really. Just correspondingly lower latency and perhaps a touch more "silkiness" on some instruments in the higher frequencies. I'm guessing the Apollo oversamples for the lower sample rates anyway, so there's not much in it. (And some of the UAD plug-ins themselves are upsampled as well).
I tried recording some acoustic guitar - first without any UAD plug-ins inserted - the preamps sounded open and clean-sounding. Very transparent and very low noise. About what I expected from UAD. Very nice.
I then tried inserting some plug-ins into the Console app that comes with the Apollo.
 |
| UAD Apollo Console App |
Some gentle compression with the 1176SE, Pultec adding small amount of top, and LA3A as peak limiter. Beautiful - now the guitar was sounding shiny and firm, with no nasty artifacts, and no noticeable noise problems despite the compression.
I had to pull the fader down in Logic and just monitor through the UAD console app to avoid the latency-induced comb-filtering.
Next I thought I'd try one of the High-impedance instrument inputs on the Apollo's front panel. The input automatically switches from Mic/Line to Instrument when you plug in. Handy. Oh - and it sounds really good. I'm not suprised - UA has an excellent reputation with not only audio quality, but also pro-level usability design.
As I'm guilty of pretty much always just plugging my Fender Jag-Stang straight into my interface to capture ideas as fast as possible - I could tell that this immediately sounded better than my old interface ever did. A LOT better. Winding the gain knob up gave a really nice creamy analogue distortion too. I'm really liking this unit so far. Clean on mic inputs, nicely coloured analogue on the Hi-Z inputs.
Let's try the dodgy acoustic guitar piezo bridge pickup. Plugging straight into the Hi-Z jack. Wow - same thing again. A huge improvement - in fact the best I've heard it sound from the pickup. It's normally quite clicky and overly percussive. This sounds much smoother and fatter.
And my Jaguar bass sounds great plugged straight into the Hi-Z input as well - as much as I love my old Drawmer 1960 tube preamp on bass, I have much more control with the Apollo.
So - it seems like we're getting 4 very good quality mic preamps with this unit. The mic inputs can be switched to the line inputs on the back, with the first two inputs automatically switching to Instrument when something is plugged into the Hi-Z jacks in the front.
There's also the usual S/PDIF I/O (with auto sample rate conversion if you like), and an S-Muxed dual ADAT I/O that can do either 8 channels of regular 44.1 or 48kHz sample rates or handle up to 4 channels of 192kHz audio.
There's two headphone outputs that can be fed from various parts of the Console app.
The controls are simple and clear - each of the four preamp inputs can be selected by pressing the gain knob, and rotating to set amount of gain. A circular light ring surrounding the gain pot shows the amount of gain added. Switches apply 48v Phantom Power, Pad, high-pass filter etc to the selected channel.
The Console app shows much more detail, reading out in decibels and showing the state of everything all at once. It has its own built-in headphone busses and effects monitoring setup.
Because this is a digitally-controlled preamp, all settings may be saved and recalled - as I mentioned, there is a Console plug-in (in all the typical plug-in formats) that can be inserted into the session that can recall all these settings automatically if you like.
Conclusion
A great unit overall. Sounds fantastic and is, without doubt, value for money - especially the Quad version.
Not quite perfect yet - there's still a few very minor things to iron out with the interface software, and the Thunderbolt adaptor is still absent (as at July 2012).
For this price (about USD$2,500 or just under NZD$4,000), the question is why woudn't you buy one.
I did.
ps. I forgot to mention, for those of you who know little about UAD yet; like most of their plug-in based devices, the Apollo comes standard with the UAD-2 Analog Classics plugins collection (the 1176LN, LA-2A and PultecEQP-1A) and a voucher for $100 worth of plugins.
That's pretty cool value - especially if you wait until one of their fairly regular online sales to use it.
Plus - when you install your plug-ins, it installs every UAD plug-in, and the others (that you haven't purchased yet) can be demoed for two weeks from whenever you click the little "demo" button on the plug-in. I've also noticed that all the demos seem to be reset every time you purchase a new plug-in. These guys are very canny yet professional with their marketing, and they certainly know how to look after their customers.
Monday, May 21, 2012
8 Top Logic Pro 9 Features
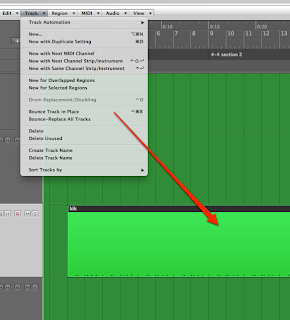 | |||
| Bounce Track in Place |
Click on the pictures for larger versions.
8 Bounce-in-place, for either track or region. Bounces down either your audio instrument MIDI regions or your audio regions - with or without plugins - to new audio regions and then mutes the original track or region. Great for rapidly "printing" any special processing or pitch-fixing plug-ins like Melodyne into a solid file. Note you can also do this for EVERY track simultaneously should you wish to export all your tracks into a different DAW program for mixing or something. Closely related to...
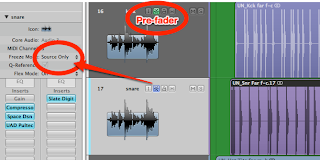 |
| Freeze Track - the Two Modes |
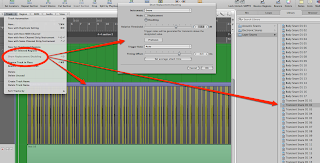 |
| Replacing or Layering Drum Track |
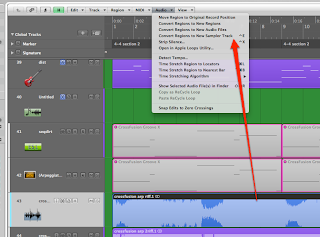 | |
| Convert Audio Region to Sampler |
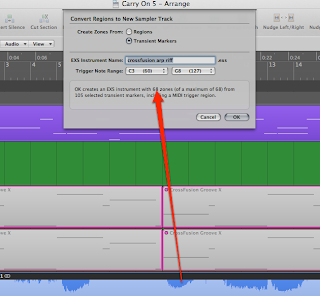 |
| Select Sampler Options |
 |
| Final Converted Sampler Track with MIDI region |
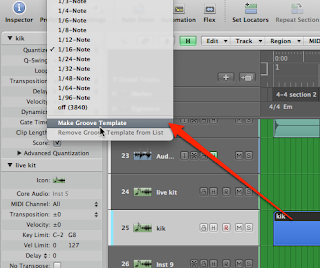 |
| Making Groove Template from MIDI Region |
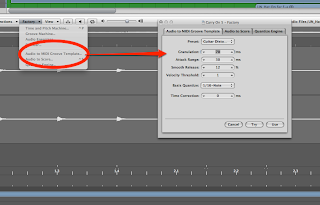 |
| Audio to MIDI Groove Template |
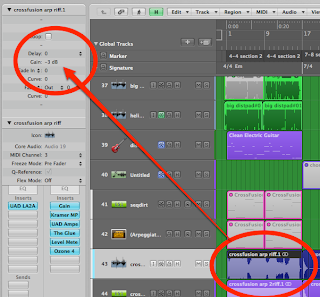 |
| Region Gain |
3 Region Gain - many users of Logic still don't know you can use the little region inspector panel top left of the Arrange window to adjust the individual gain for each audio region. It can replace the use of automation in some cases - just cut up your regions and set the gain for each one. It handily does this before it goes through any plug-ins in the channel strip (although this can be a problem if you have compressors inserted and you're trying to use it instead of automation - the compressor may "fight" any gain changes).
 |
| Capture Record Button |
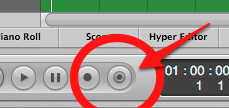
Fear not, just press this little button and what you just played will magically appear as recorded. If the button doesn't show up for you - Ctrl-Click on your Transport bar and add it.
Tip - use "Take Folder" mode for your MIDI cycle recording - even more useful.
NB: This doesn't work with audio unfortunately - unless you use the sneaky "Punch-on-the-fly" mode trick. When "Punch on the Fly" mode is selected under the Audio menu, Logic is ALWAYS recording any armed audio tracks whilst playing-back. You just need to actually hit "record" for a second while it's still playing to let Logic know you want to capture and hence retrospectively grab what you just played.
 |
| Take Folder |
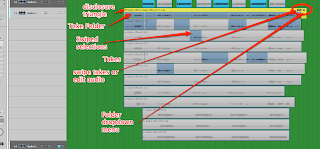
1 Take Folders. Most people know about this one but it still bears mentioning. Record while in cycle mode, then just swipe the bits you want to keep from each take. It's a fantastic way to get great vocal takes and Apple really has this one nailed better than the competitors. Many people aren't aware of all of its cool features though.
Some additional tricks are; creating alternate versions of your comp (good for backing vocals or doubling lead vocals), exporting particular comps to duplicate tracks, editing the audio itself (eg trimming or moving parts) while comp'ing a good take, tagging the best bits as you go, or editing the size of the looped section (and folder) if it chops off the beginning of the loop each time.
You can also manually create a take folder out of various selected audio regions for creative purposes and you can also cut the take folder into chunks if needed.
What are your favourites?
Subscribe to:
Comments (Atom)
