Friday, April 10, 2009

Getting creative with Multi-Band Compressors

What many people don't realise is that conveniently bundled into each multi-band compressor is a multi-band crossover that splits the overall spectrum into two or more frequency bands - 4 or 5 bands are quite common nowadays.

This gives us the ability to do some cool tricks in our digital audio workstation of choice. For example, having a duplicated instrument track with different crossover bands cut on each track allows us to process different frequencies in different ways for the SAME instrument.

This allows us to add a plugin that might only affect the high frequencies of a guitar or bass without affecting the lows, for example.

All these tricks rely on disabling the compressor part of the plug-in by setting a 1:1 compression ratio (ie no compression) - we only want to use the crossover part of the plug-in.


BASS GUITAR
Say you want to put a flange or chorus on the bass guitar without robbing the bottom-end fatness. Usually inserting delay-based effects on an instrument causes comb filtering, which greatly affects the frequency response over the entire spectrum - with some pretty major frequency cuts going on. This is particularly critical on any instrument where you wish to retain the low frequencies.

Duplicate your bass region to an extra track then insert a multi-band compressor on both tracks. You really only need two frequency bands for this.

Cut the top band on the "bass" version of the track, and cut the bottom band on the other one that you want to insert the chorus/flange on. This will be inserted after the multi-band plugin by the way.

This assumes that you have your crossover points set the same in each multi-band plug-in. Set the crossover frequency to around 200 Hz for starters, then tune for best effect. Remember - make sure you match this crossover point on both multi-band plug-ins.

Tip - fine-tune the delay time in your chorus or flanger to make it sound the most "musical".
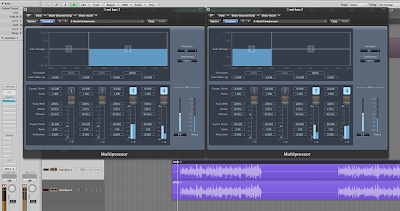

Note that this trick also works really well when adding distortion to a bass - although in this particular case you may want to set up one of your two duplicate bass tracks to distort the entire bass guitar spectrum, and have the other track so it just blends in the clean low bass.

EQ
Another trick - tweaking the "EQ" by boosting and cutting bands rather than using conventional EQ. This is great for just fixing up broad EQ problems - eg too much top or bottom end, but with no real peaky frequencies that need fixed. Using the multi-band keeps the sound smooth.

DE-ESSING
Need to fix a sibilant frequency? Obviously if you have a dedicated De-Esser plug-in, this will probably do the trick, but if you don't have one - try using just a single band on the multi-band compressor instead. Make sure the other bands are set so they don't activate, then set one band between eg 3kHz and 8kHz (use your ears). Stick a high-ish ratio on it (say 8:1), set the threshold quite low; -20dB to -30dB. Tweak to suit.
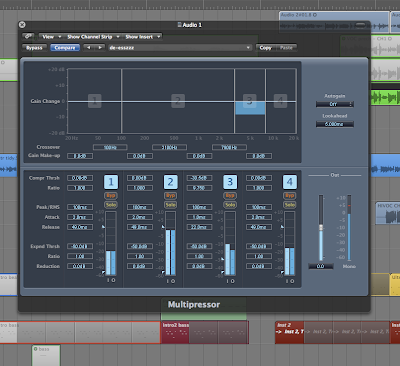

Note that although de-essing is the most obvious use of this kind of technique, this will also work on other "resonant" frequency problems - perhaps a single bass note that goes wild, or boomy mids on an acoustic guitar.

DJ Hi-and Lo-Cut techniques.
Most DJ mixers have a fairly extreme set of filters built in for completely removing lows or highs from a track. This can be simulated in your DAW by using two duplicate tracks - one with the lower bands cut in the Multi-band compressor, and the other track with the highs cut. Both tracks together should sound like the original, but muting one or the other tracks will apply the "filter". You can of course do this with a matching pair of high and low-pass filters instead - one on each track, but these may not be as "symmetrical" as the multi-band, so both tracks running together may not sound as "pure" as the original.

Any other tricks you know of?
Thursday, April 9, 2009

Making your own reverb Impulses


For those who aren't in the know about Impulse or Convolution reverbs, they take a "snapshot" of the ambience of a room or other space (or even audio equipment) that can then be used within a specialised reverb plug-in. (eg Space Designer, Altiverb, Waves IR1, TL Space, Voxengo Pristine Space, SIR, Nebula)

This gives a scarily accurate reproduction of the space, but it does have it's down sides as well.

It's very heavy on processing power - every bit of each impulse sample has to be processed against every single bit of each audio sample you're putting through it. For 24 bit source and 24 bit impulse that's 24x24=576 calculations for EACH sample. This means impulse reverbs not only suck the power from your computer's CPU, they also have a high latency - and no sound comes out of the other end of the reverb until the first sample gets processed through ALL the samples in the entire impulse. This means if you change a parameter in the reverb plug-in, there's quite a delay before you hear the effect.

Anyway - enough of the scary maths, let's talk about how to actually make your own impulse "recordings" of rooms. I'm going to focus on using Space Designer in Logic Pro, because Apple have very kindly created an Impulse Utility that makes the whole process stupidly easy - even for making surround-sound impulses if you feel the need.


What we're going to do:

We're going to play a swept tone into a room, record it through a couple of microphones, trim the resulting file and finally deconvolve it into your beautiful reverb patch.
Note: Grabbing responses from equipment is better with a single-full-volume sample "click" rather than a sweep, but a sweep is usually better for spaces because it has better frequency response, and better record levels - watch out for items resonating in the room though!

What we're going to need:
  • A Mac computer with Impulse Utility. A laptop is the most convenient.
  • Good quality audio interface with Mic preamps. With phantom power for the mics.
  • Powered full-range speaker - to feed the swept tone into the room. Bigger is better so you can generate the lowest frequencies and it can fill the room with sound without distorting.
  • At least one good quality microphone - a stereo pair of small-diaphragm condensers is ideal.

Setting up:

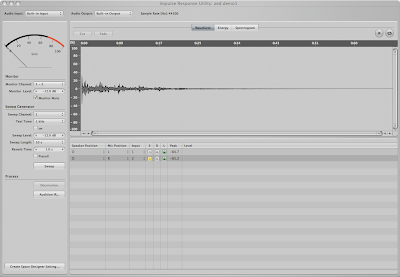
The first thing is to set the correct input/output devices.


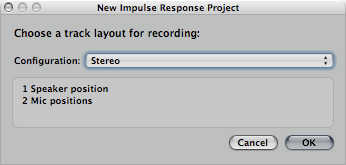
Then decide how many channels you want to record - I'm just using "Stereo" since I'm only using one source speaker (True Stereo is for two speakers/two mics).


Choosing the positioning of the mics and speaker/s is a whole book in itself, but as a starter I recommend you have the speaker next to you at one end of the room (pointing into it), and put the mics two-thirds of the way back, pointing away from the speaker. This avoids direct sound from the source in your reverb patch - giving more room colour. Feel free to record a whole bunch of different combinations if you have the time - there's no right or wrong.

Then you have to send some tone to your speaker to set the playback level. Press the tone button, adjust levels as fast as possible before the tone drives you crazy.


Recording the file:

Arm your track/s. (You could theoretically record each track at different times, for example if you had only one good mic).


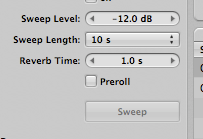
You can set the expected reverb time for the capture - it gets added on at the end of your sweep.
Be very quiet. Shhhh.
Hit the Sweep button. (Where does your hearing cut out on the tone sweep?)


Voila! The Impulse Utility forces you to save the session/captured file now, so you could always finish this later if you have to quickly pack up and escape.

Trimming the resulting impulse:

You'll probably need to trim the silence from the start and end of the impulse file - you'll want a tightly-edited front, and why waste CPU cycles processing any silence at the end?


I recommend you do a fade into silence at the end.
Hardly-know factoid: One of the benefits of trimming the beginning of the impulse file, from a swept tone rather than a click, is that it removes any harmonic distortion that was generated during the process of playing the swept tone. The distortion conveniently ends up BEFORE the impulse click. Awesome.

Auditioning the Impulse:

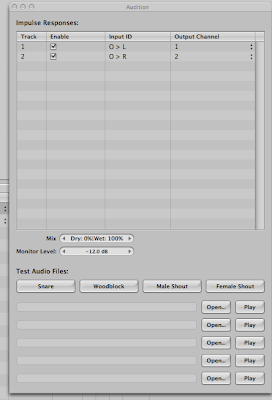
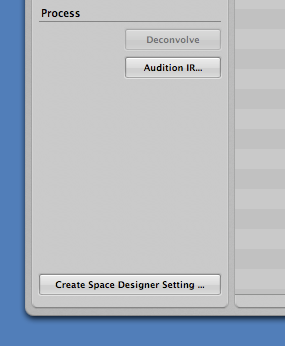
Pressing the Audition IR button will allow you to play some preloaded sounds (or you can load your own waves) through your new reverb to see what it sounds like before saving it as a patch.


Exporting as a Space Designer patch:

Hit the Create Space Designer Setting button, name your patch, done!


It magically appears in your Space Designer patch list.

Once you've been through this process once, you'll see just how easy it really is, and you'll probably start noticing the reverb sound in stairwells a lot more.

Saturday, April 4, 2009

RTFM! Or not.

Any regular denizen of discussion groups and help forums - especially of a technical nature or having anything to do with software apps etc, will be familiar with this statement.

RTFM! Read the F****** Manual.


Set of Logic Studio Manuals (Photo by Uninen)

Usually it's applied in the context of, why are you here asking this stupid question - haven't you even bothered to read the manual? Loser!

Unfortunately the people who respond in this fashion are the ones who are actually happy reading manuals and love theory. I'm one of these people, by the way. I enjoy reading manuals, and once felt a little of the same scorn towards those who didn't.

But lately, as I've discovered more about education and the way people learn, I've realised that most people struggle to read manuals - in fact there are probably a vast amount of people out there who are happily using software apps who struggle to read anything at all. To deny them support is to discriminate against those who are not on a similar educational or learning level to ourselves. It's elitism, and biased very strongly against newbies who are just starting out.

Do we expect them to read the manual before using the program? I would guess that the amount of people who do that are well in the minority - if they exist at all.

And lets not forget that manuals are not instruction booklets - they are usually dry and written by engineers, or at the least by someone who is so familiar with the program that they may find it hard to remember what it was like to know nothing about it.

It's easy to make assumptions about what the reader already knows, and most manuals alternate between ultra-simplistic first-timer statements like "Thank you for buying this product - this is the "on" button", then cut to hard technical data that only another engineer can decode. As an audio engineer of many years, I have hunted in vain through manuals for typical useful info, only to come away frustrated and annoyed. And occasionally entertained by poor translations, I'll admit.

Now all this isn't to say that we shouldn't recommend people read the manual, as there are people out there who haven't even considered that particular avenue, but we should continually remember that our own learning preferences are not the same as everyone elses, and it shouldn't be considered as a compulsory requirement - just another way to gain information.

Some people may prefer verbal communication, some watching a video of how something works, some might need all that dry information from a manual decoded and spelt out in an easier to understand and simple set of instructions.

Oh - lets ask an expert in a forum!

"RTFM!"